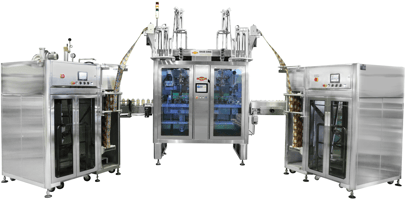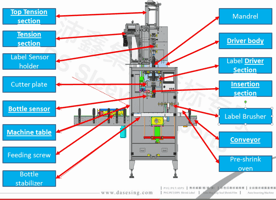

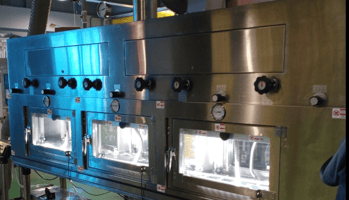
Discover the unstoppable progress in shrink sleeve systems and the mastery of the shrink tunnel...
Are you in the market for a shrink sleeve machine? Look no further! This ultimate guide will provide you with all the information you need to make an informed purchase.
1. 瓶子與輸送帶滑動(書評子與輸送帶太滑) 2. 圓瓶與非圓瓶 3. Precision in Label Placement and Seam Alignment
The visual appeal of a shrink sleeve relies heavily on the accuracy of its application. Buyers must assess the machine's ability to maintain precise registration and consistent seam positioning, even at high production speeds. Advanced applicators equipped with servo-driven cutting mechanisms and optical registration sensors ensure that labels are applied with millimeter-level accuracy. This precision prevents aesthetic defects such as twisted seams or misaligned graphics, which can negatively impact brand perception on retail shelves.
Buying a shrink sleeve applicator involves both equipment-level decisions and system-level integration mechanics. A machine that performs flawlessly on a dry supplier floor can easily become a line bottleneck if real-world line conditions aren't rigorously tested.
Step 1: Vet Suppliers & Request Machinery Data
Begin your procurement process by requesting comprehensive technical data and proof of capability from potential equipment suppliers. Focus on how their machine features align with your specific container profiles:
- Container Geometry & Mandrel Technology: For complex, asymmetric, or highly contoured bottles, verify if the vendor offers modular, quick-change mandrels (bullets) and multi-axis servo film feeding to prevent sleeve twist or mis-alignment.
- Container Material & Pre-Handling Add-Ons: If running thin-walled PET bottles, empty aerosol cans, or glass, ask about integrated vendor add-ons—such as line air-knife drying units, anti-static ionizers, or bottle-clamping timing screws—to ensure stable container transfer before sleeve application.
- System Capabilities & Speeds: Evaluate cutting mechanism precision (rotary vs. guillotine), optical registration accuracy, and rated throughput (CPM) across all your planned SKU dimensions.
- Proof of Performance: Require customer references and case studies demonstrating reliable operation on containers with similar shapes, materials, and line speeds.
- The conveyor frame abd conveyor belt compatiblibility with container: the container bottom contact area will change the fretion between container and belt. There are pontential risk of sleeving trouble due to container minor shift inside sleeve applicator. The conveybelt is usually provide from another vendor and sleeve applicator vendor cannot test is at their factory. When the container is wet, the container shift range is too big to interfere sleeving timing.
When the conveyor is supplied by a third party, the applicator OEM usually performs Factory Acceptance Testing (FAT) on a short, dry, stationary internal conveyor segment or test stand. In actual production—especially in wet, cold-fill, or high-humidity environments—the reduction in the coefficient of friction ($\mu$) causes container slip, micro-rotation, or positional lag right as the sleeve is dropped or shot onto the bottle.
Here is a breakdown of why this happens, how it disrupts sleeving timing, and concrete technical solutions to integrate into your machine spec or RFP.
1. The Mechanics of the Friction & Shift Failure
When a container enters the sleeve applicator's dropping zone, it relies on predictable friction between the bottle base and the conveyor chain/belt to maintain constant pitch and speed.
$$\text{Frictional Force } (F_f) = \mu \cdot N$$Where:
- $\mu$ = Coefficient of friction between container bottom and conveyor surface
- $N$ = Normal force (container weight)
What Happens in Wet Conditions:
- Hydroplaning Effect: Moisture from cold filling, rinsing, or ambient condensation acts as a lubricant, severely lowering $\mu$.
- Container Lag & Tipping: When the infeed timing screw (scroll) or side belts release the container to enter the sleeve drop zone, the container hesitates or slips on the slick chain instead of accelerating synchronously.
- Sleeve Catching & Mis-Cuts: The optical registration sensor expects the bottle top at a precise microsecond ($t_0$). If the container shifts position by even 2–5 mm due to slip, the falling sleeve hits the lip or shoulder of the bottle, causing:
- Crushed/crumpled sleeves
- High-edge sleeve jams inside the cutter assembly
- Uneven sleeve heights post-shrink
2. Technical Solutions to Prevent Container Shift
To bridge the gap between third-party conveyors and the sleeve applicator, implement these engineering controls:
A. Mechanical & Infeed Stabilization
- Top-Hold Stabilization Belts (Overhead Retainer): A synchronized overhead belt catches the top of the container while it passes through the sleeve dropping zone, physically forcing it to move at line speed regardless of conveyor base friction.
- Driven Side-Gripper Belts (Bottom Shooter Assist): Instead of relying solely on the bottom conveyor, dual servo-driven side belts hold the bottle body and transport it through the sleeve firing zone with zero slip.
- Precision Infeed Timing Screws (Scrolls): Use custom-machined pocketed timing screws that extend as close to the sleeve drop zone as mechanically possible to maintain strict container pitch.
B. Pre-Sleeving Moisture & Surface Control
- Infeed Air-Knife Dewatering Station: Mount targeted air knives (using high-velocity blowers) upstream of the applicator to strip condensation off the bottle base and sidewalls.
- High-Friction Conveyor Chain Inserts: Specify modular conveyor chains with rubber/elastomer top inserts (grip-top chain) in the sleeving zone rather than standard low-friction acetal/POM slats.
C. Sensor & Timing Optimization
- Container-Triggered Fiber Optic Tracking: Use a dual-beam or high-speed fiber optic sensor positioned directly at the sleeve exit point to trigger the sleeve cutter/shooter based on the actual physical presence of the bottle edge, rather than relying on a fixed upstream encoder signal.
Buying a shrink sleeve applicator involves both equipment-level decisions and system-level integration mechanics. A machine that performs flawlessly on a dry supplier floor can easily become a line bottleneck if real-world line conditions aren't rigorously tested.
Here are the major purchasing considerations, followed by the specific risks of integrating without comprehensive full-line testing.
Part 1: Major Considerations When Buying a Sleeve Applicator
To ensure the machine delivers high OEE (Overall Equipment Effectiveness) and long-term performance, evaluate these six core areas:
1. Container & Material Dynamics
- Geometry & Stability: High center-of-gravity, unstable, or highly contoured bottles require specialized handling (e.g., timing screws, top-hold belts) to prevent tipping or twisting.
- Base Contact Area & Friction: The contact surface between the bottle base and the conveyor belt dictates movement stability. Condensation or liquid spills drastically reduce friction, causing container lag.
- Film Substrate & Gauge: Compatibility with your chosen film (PETG, OPS, PLA, or PCR) and thickness (e.g., standard 45$\mu\text{m}$ vs. ultra-thin 20–30$\mu\text{m}$). Thin films require high-precision tension control to prevent stretching or jamming.
2. Speed & Application Type
- Target Throughput (CPM/BPM): Define continuous operating speed vs. peak line speed.
- Sleeve Scope: Full-body, partial-body, or top tamper-evident neck band. High-speed full-body application requires longer shot distances and precise servo cutter timing.
3. Cutting & Mandrel Engineering
- Cutter Technology: Rotary cutters (continuous high-speed) vs. servo guillotine blades. Evaluate blade replacement time, cost, and lifespan.
- Mandrel (Bullet) Design: Modular, tool-less mandrels allow fast changeovers between bottle diameters while maintaining positive film opening.
4. Shrink Tunnel Selection (Steam vs. Electric)
- Steam Tunnels: Mandatory for complex contours, cold/wet containers, and high-graphic aesthetics. Requires steam piping, exhaust venting, water drainage, and downstream drying.
- Electric Hot Air Tunnels: Ideal for simple neck bands or dry environments, but higher risk of film distortion on deep curves.
5. Changeover & Ergonomics
- Tool-less changeover for mandrels, guide rails, and cutter heads.
- HMI recipe storage (storing speed, optical sensor delays, and tunnel temperature settings).
6. Build Quality & Compliance
- SUS304/316 stainless steel frame construction, IP-rated washdown electrical enclosures, and safety certifications (TÜV, CE, UL).
Part 2: Potential Risks of Integrating Without Full Actual Testing
Integrating a shrink sleeve applicator into an active line without testing all actual SKUs, production containers, liquids, films, and third-party conveyor systems introduces severe operational risks:
Un-tested Variable (Moisture / Friction) ──> Container Lag / Shift ──> Sleeving Misalignment ──> Line Jam & Downtime Risk 1: Container Position Shift & Timing Failures (Friction Disconnect)
- The Cause: Factory Acceptance Testing (FAT) is typically done on dry, short internal test conveyors. On the actual production line, containers may be cold, wet from rinsing/filling, or running on third-party conveyor chain materials with a different coefficient of friction ($\mu$).
- The Impact: Moisture causes the container base to hydroplane or slip when exiting the infeed timing screw. A positional drift of just 2–5 mm causes the falling sleeve to hit the container shoulder, resulting in crushed sleeves, cutter jams, and immediate line stops.
Risk 2: Condensation Blocking Film Application
- The Cause: Cold-filled beverages (e.g., dairy, juice, beer) cause ambient air moisture to condense on the outside of the container upstream of the applicator.
- The Impact: The printed sleeve clings to wet bottle walls mid-drop, causing the label to stick higher than target position or bunch up unevenly before entering the tunnel. Fixing this post-installation requires unbudgeted air-knife drying stations.
Risk 3: Film Web Tension & Static Jams
- The Cause: Running production-grade film rolls on-site behaves differently than small test rolls. Environmental factors like low ambient humidity increase static electricity.
- The Impact: Static charge causes thin films to cling to the mandrel or cutter blades rather than dropping cleanly onto the bottle. Without on-site anti-static ionizer testing, high-speed line efficiency drops significantly.
Risk 4: Heat Tunnel Distortion & "Smiling" Seams
- The Cause: Testing empty bottles at the factory yields completely different thermal profiles than testing liquid-filled bottles on-site.
- The Impact: Liquid inside the bottle absorbs thermal energy rapidly. Empty-bottle FAT settings will result in wrinkling, distorted graphics, or "smiling" bottom seams when applied to actual cold-filled products in production.
Risk 5: Upstream & Downstream Line Backpressure Jams
- The Cause: Lack of full-line signal handshaking (PLC communication) between the applicator, upstream filler/capper, and downstream shrink tunnel/packager.
- The Impact: If downstream equipment pauses, bottles line up back-to-back into the applicator. Without synchronized side-gripper belts or top-hold retainers, backpressure forces bottles out of alignment, leading to high-speed collisions in the sleeving zone.
Summary Mitigation Checklist
To prevent integration failure, ensure your purchase contract includes:
- [ ] Comprehensive FAT with Actual Production Variables: Supply the OEM with actual liquid-filled, cold/wet containers and production-grade printed film rolls for factory testing.
- [ ] Positive Container Handling: Mandate top-hold stabilization belts or synchronized side-gripper belts if running lightweight or wet containers on third-party conveyors.
- [ ] Pre-Sleeving Moisture Control: Spec inline high-velocity air knives upstream of the applicator if cold filling or rinsing.
- [ ] Guaranteed SAT (Site Acceptance Testing) Metrics: Tie final vendor payment milestones to achieving target OEE and throughput on your actual production floor.
Requesting Information
When buying a shrink sleeve machine, it is important to start by requesting information from the manufacturers or suppliers. This will allow you to gather all the necessary details about the machine and make an informed decision. You can inquire about the machine's specifications, features, and capabilities. It is also a good idea to ask for references or case studies to understand how the machine has performed for other customers.
Additionally, you can request information about the warranty, after-sales service, and technical support provided by the manufacturer. This will ensure that you have all the necessary support in case of any issues or maintenance requirements.
Remember to provide detailed information about your specific requirements, such as the type of bottles you will be using, the size of the bottles, and the type of labels you want to apply. This will help the manufacturer or supplier understand your needs better and provide you with accurate information.
Sleeve Speed: Bottles per Hour
One of the crucial factors to consider when buying a shrink sleeve machine is the sleeve speed, which refers to the number of bottles the machine can handle per hour. The sleeve speed will determine the production capacity of the machine and how quickly you can label your bottles.
To determine the appropriate sleeve speed for your needs, you should consider your production requirements. Calculate the number of bottles you need to label per hour or per day, and choose a machine that can handle that volume. Keep in mind that the sleeve speed may vary depending on the size and shape of the bottles, as well as the complexity of the labels.
It is also important to note that higher sleeve speeds may require more advanced machines. Therefore, it is essential to strike a balance between your production requirements and your budget.
Feeding Bottle Direction
The feeding bottle direction is another crucial aspect to consider when buying a shrink sleeve machine. The direction in which the bottles are fed into the machine can impact the ease of operation.
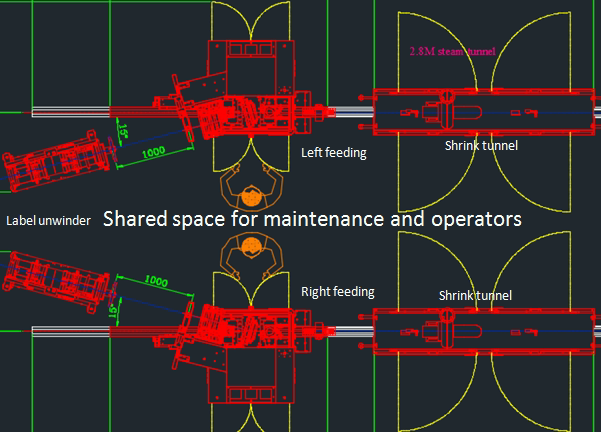
There are two common feeding bottle directions:left or right. As above figure, the layout of feeding direction will affect the total space and maintenance space. Operators will need to perform labels reels change and shrink tunnel adjustment.
Steam Tunnel or Heat Tunnel?
When it comes to shrinking the sleeves onto the bottles, you have two options: using a steam tunnel or a heat tunnel. Both methods have their advantages and considerations, so it is essential to choose the one that best suits your needs.
A steam tunnel uses hot steam to heat the shrink sleeves and make them conform to the shape of the bottles. It is a popular choice for applications where heat-sensitive products or materials are involved. Steam tunnels provide precise and uniform heating, ensuring a perfect shrink every time. However, they may require a separate steam generator + pressure reducing station and might not suitable to apply to pharmaceutical products.
On the other hand, a heat tunnel uses heated air to shrink the sleeves onto the bottles. Heat tunnels are generally faster than steam tunnels and require less maintenance. They are suitable for a wide range of products and can handle high-speed production lines. However, they may not be suitable for heat-sensitive materials or products and high power consumption. Yet, they have a lower heating transfer-rate compared to steam tunnels and may need to increase temperature over 400 ℃.
Consider the nature of your products, production speed, and your specific requirements when deciding between a steam tunnel and a heat tunnel.
Bottle Dimension and Label Size
The bottle dimension and label size are critical factors to consider when buying a shrink sleeve machine. The machine must be capable of accommodating your bottle sizes and applying the labels accurately.
Before purchasing a machine, provide the manufacturer or supplier with detailed information about your bottle dimensions, including the diameter and height. This will help them determine if the machine can handle your bottles effectively. Additionally, consider the range of bottle sizes the machine can accommodate (There is size limitation of shrink sleeve machine and shrink tunnel. Usually bottle diameter below 140mm and height below 360mm), as this may impact your future production needs.
Similarly, discuss the label size requirements with the manufacturer or supplier. Ensure that the machine can handle your desired label size and apply it accurately on the bottles. Consider the maximum and minimum label sizes the machine can handle, as well as any special label requirements, such as full body labels or partial sleeve labels.
By considering the bottle dimension and label size, you can ensure that the shrink sleeve machine meets your specific requirements.
Cap Sealing or Body Label
Another important consideration when buying a shrink sleeve machine is whether you require cap sealing or body labeling. This depends on the type of product you are packaging and your branding or labeling requirements.
Cap sealing involves applying a shrink sleeve on the cap or closure of the bottle, providing tamper-evident sealing and enhancing the product's visual appeal. Cap sealing is commonly used for beverages, pharmaceuticals, and other products where the integrity of the seal is crucial.
On the other hand, body labeling involves applying a shrink sleeve on the body of the bottle, covering a significant portion or the entire surface. Body labeling allows for more extensive branding and product information display. It is commonly used for cosmetics, food products, and promotional packaging.
Consider your product type, branding requirements, and packaging goals when deciding between cap sealing or body labeling for your shrink sleeve machine.
Labeling After Filling
One consideration when buying a shrink sleeve machine is whether you want to label the bottles before or after filling them with your product. Both approaches have their advantages and considerations, so it is important to evaluate your specific needs.
Labeling before filling allows for a cleaner and more efficient labeling process. It eliminates the risk of high temperature damaging the goods inside container, like dairy and pharmaceutical products. Sometimes, it is commonly used for products where the labels need to be perfectly aligned or where the filling process may cause label distortion.
Labeling after filling, on the other hand, allows for greater flexibility in product variations and customization. It enables you to apply different labels or customize the labels based on the filled product. This approach is commonly used for products with multiple flavors, variants, or special promotions.
Consider your product type, production process, and labeling requirements when deciding whether to label before or after filling your bottles.
Factory Design
Lastly, when buying a shrink sleeve machine, it is important to consider the factory design and layout. The machine needs to fit seamlessly into your production line and workflow, ensuring optimal efficiency and productivity.
Evaluate the available space in your factory and determine the best location for the shrink sleeve machine. Consider the machine's dimensions, including its length, width, and height, and ensure that it can be easily integrated into your existing production line. There is a detail that might easily be neglected—make sure that move-in path is clear for machine, including elevator and route.
Additionally, consider the accessibility and ease of maintenance for the machine. Ensure that there is enough space around the machine for operators to perform routine maintenance tasks and troubleshoot any issues that may arise.
By considering the factory design and layout, you can ensure that the shrink sleeve machine seamlessly integrates into your production process and contributes to your overall efficiency.
If you need any more information, welcome to contact us.
Constct us:
matt@dasesing.com